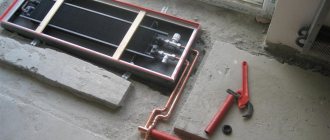
Assembling the structure
It is not difficult to assemble radiators together, but first you should purchase new intersectional gaskets or use an asbestos cord impregnated with graphite powder previously diluted in drying oil instead.
Since the temperature inside the boiler can exceed +600 degrees, it is worth taking care of the gaskets in advance. The tightness of the entire structure depends on their quality and strength.
The sequence for assembling radiators is as follows:
Nipples equipped with right-hand and left-hand threads are screwed into each section. Asbestos cords are wound around them.
The sections are connected in pairs by alternately tightening the nipples
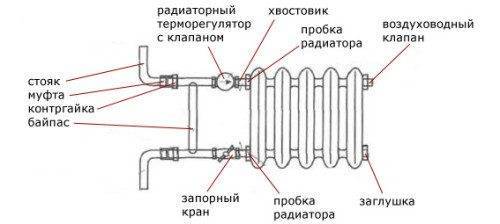
It is important to make the same number of turns with the wrench, so as not to cause distortion. All sections of the cast iron radiator are connected in the same way. The return and supply pipe should be connected diagonally, closing the unused openings with plugs .. On one side of the riser there should be a right-hand thread, and on the other - a left-hand thread
If this does not work, then you need to screw on the nipple, and on it a coupling with a drive
There should be a right-hand thread on one side of the riser, and a left-hand thread on the other. If this does not work, then you need to screw on the nipple, and on it a coupling with a drive.
Heater from battery and heating element
When it is necessary to decide how to heat the room: electricity or solid / liquid fuel, consumers are confused by both options with their high cost. Therefore, many are interested in the question of how to make a heater from a cast-iron battery so that it is cheap and does not require special care.
Craftsmen have long been using the advantages of installing a heating element. Its main merit is that, with the correct connection, it can easily heat small rooms without additional heat sources, for example, a greenhouse, garage, workshop or chicken coop.
A cast-iron battery with a heating element is, in fact, an effective way to independently heat a small room or use it as an additional source of heat in an apartment in a city heating network.
Teng is a metal cylinder with a spiral installed inside. The walls of the tube do not come into contact with the spiral due to the insulation with a special filler. Installed in a heating device, a similar homemade cast-iron battery heater has the following advantages:
- This is a reliable design, completely safe for human life.
- This device has a high efficiency.
- They are simple and durable to use.
- The heating elements are practically invisible, as they are installed directly into the heating system.
- Since they are equipped with a thermostat, they help to save energy.
- The amount of electricity it consumes is significantly lower than that of conventional electric heaters, boilers or underfloor heating systems.
- To make such a heater from a cast-iron battery with your own hands, you do not need any permits. Teng is simply mounted in the heating pipe.
Even a person who is far from electrical work can install and connect the heating element. They are usually sold complete with mounting and protection parts, regulating devices and accessories for connecting to the mains. Teng simply twists into the radiator socket and plugs into the socket.
It should be remembered that you need to install the heating element in a horizontal position. You can turn on the device to heat the room when there is a coolant in the system.
For safety control, the heating elements are equipped with double overheating protection.Control sensors are located both inside the device and outside.
Modern heating elements for connecting to cast iron radiators are equipped with two modes of operation, which allows them to be used as the main source of heating, and then they turn on at full power, either as an emergency or periodic. In the latter case, it is advantageous to use such a technology, for example, in dachas where they do not live permanently, but you need to watch out for pipes and batteries not to freeze.
To make efficient heating from cast-iron radiators with your own hands, you need to choose a heating element of suitable power. For this, a calculation is made taking into account the required heating of the coolant and its amount in the battery.
Improving air convection
Among the simplest methods that will help you understand how to increase the heat transfer of a heating pipe with your own hands is the use of the laws of convection. Often, in apartments, batteries are filled with pieces of furniture, protected by decorative boxes or hidden behind heavy curtains. All these elements impede air circulation and it is quite difficult to achieve comfortable temperature conditions in the room, even if the central heating is operating at full capacity.
To optimize the air flow rate, it is necessary to free up the space around the radiator as much as possible.
Without encountering obstacles in its path, the air heated by the battery will freely move around the room and provide the maximum heating level provided for by the radiator power.
Using an electric fan to improve convection
The owners, who are well familiar with the physical laws, according to which heating, sewerage, water supply is designed in houses, understand that the speed of air circulation affects the heat transfer of the battery. The faster the air circulates in the room, the more heat it can take from the radiator over a certain period of time.
To improve natural convection, electric fans can be installed near the radiators. It is worth giving preference to silent models that consume a minimum amount of electricity. The fan should be installed at a certain angle to the battery. This simple method is quite effective. He is able to raise the temperature in the room by several degrees.
Arrangement of a reflective screen
As a tool to increase heat transfer, foil for radiators can be used, which will help direct the flow of thermal energy into the room. Heat radiators that are not equipped with a reflective screen radiate heat in all directions, including given off to cold outer walls. The screen helps to focus the direction of heat flow and increase the temperature in the room.
The design of the screen is simple and affordable. It should have a larger area than the radiators and be installed on a clean wall behind the radiator. Instead of foil, you can use foil-insolon - a special material that has a foamed base on one side, and on the other is covered with reflective foil. You need to mount the screen on the wall using any high-quality construction glue.
Types of heaters
A home craftsman who wants to get a homemade "heating pad" can be offered a choice of several options:
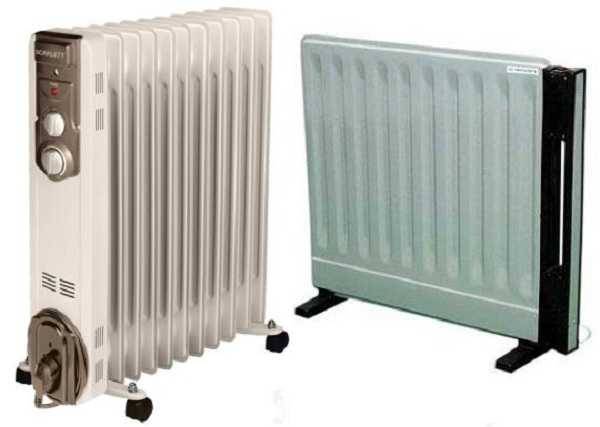
Oil
It is a container equipped with a tubular electric heater (TEN) and filled with oil.
The main element of the heating element is a spiral made of nichrome or other material with high electrical resistance, which, when an electric current is passed through it, begins to warm up. The spiral is placed in a copper tube filled with sand.
The oil removes heat from the heating element, distributes it over the surface of the case and, in addition, serves as a heat accumulator (after a power outage, the device continues to heat the surrounding air for some time).
Vapor drip
In terms of its design, a vapor-drop heater is very similar to an oil heater, only water vapor is used as a heat distribution medium. It is formed from a small amount of water that is poured into the housing.
This solution provides two significant advantages:
- When freezing, the vapor-droplet heater will not burst, since water occupies only an insignificant part of its volume.
- Steam is an extremely high capacity heat accumulator. More precisely, not so much steam as the process of evaporation: it is during the transition from a liquid state to a gaseous state that water accumulates a large amount of thermal energy, which is returned when steam condenses on the walls of the heater.
Having given off heat to the body of the device, the condensed steam in the form of water flows down to the lower part, where the heating element is installed. The power of the heating element and the volume of water are selected in such a way that the rupture of the heater with steam pressure is excluded.
Due to the fact that the body of the device is hermetically sealed, its walls from the inside do not rust from high humidity.
Candle
The flame of a candle is known to emit not only light, but also some heat.
Only it usually evaporates under the ceiling in the form of convective air currents and there is "smeared" over the entire area of the room.
Why not install a heat trap above the candle? We will tell you about what it is in the next section.
Infrared (IR)
Any substance with a temperature other than absolute zero emits "thermal" electromagnetic waves, which are called infrared.
The intensity of this radiation is in direct proportion to the temperature of the substance. Water and oil radiators also emit infrared waves, but in very small quantities, since their surface is relatively cold.
To turn a metal object into an IR emitter, it is enough to heat it up to a red glow temperature. If we use special materials, for example, graphite, then sufficiently perceptible "heat" waves can be achieved even at relatively low temperatures.
Knowing these subtleties will help us make an IR heater with our own hands, which will give us heat directly, that is, without the participation of air as an intermediary.
Other types
Since electricity is not available everywhere, structures that run on gas or solid fuels have the right to life. The latter include potbelly stoves.
Experimental data.
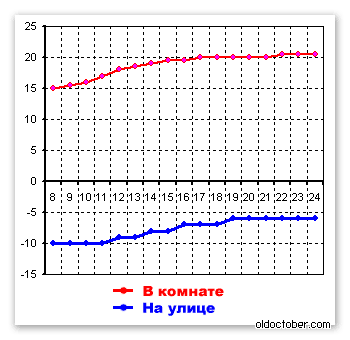
The first day of the experiment.
All graphs show temperature changes from 8.00 am to midnight.
Heat carrier temperature 42ºС.
The graph shows that the system worked more efficiently while the temperature difference between the air and the battery was large. When the difference decreased, the system stabilized.
The air temperature in the center of the room at a height of 65 cm from the floor rose from 15 ° C to 20 ° C in 9 hours.
Subsequently, the temperature increased by another 0.5 ° C.
The power consumption of the fan was 35.2 watts.
When, during the experiment, I left my room into the corridor, I immediately felt the temperature difference, because by that time I had already taken off the warm clothes.
I went to the barn and brought another fan from there. This fan was not equipped with a power switch, so I connected it through a homemade triac regulator, the design of which is described in detail here.
Well, life has become better, life has become more fun!
The second day of the experiment.
In the morning, I again measured the temperature of the coolant, as well as the temperature of the air in the room. All values remained unchanged, including the temperature overboard.
No temperature changes were noticed during the day.
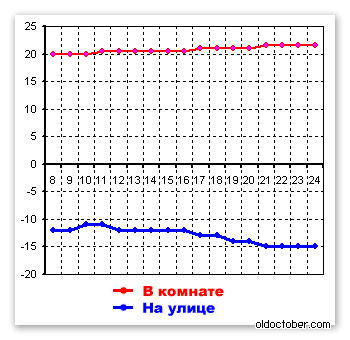
The third day of the experiment.
The coolant temperature increased by one degree and amounted to 43ºС.
The temperature outside decreased and reached -15 ° C.
At the same time, the temperature in the room increased by another 0.5 ° C and reached 21.5 ° C.
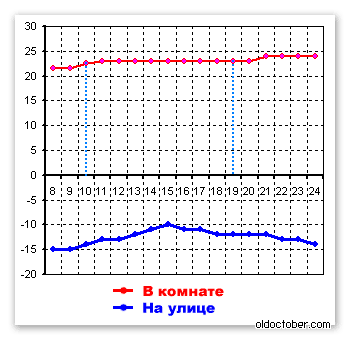
The fourth day of the experiment.
The coolant temperature is still 43 ° C.
Temperature outside in the morning is -15 ° C.
The temperature in the room in the morning was 21.5 ° C.
Since no significant temperature changes were noted over the past day, I decided to increase the air flow and installed a second fan at 10.00.
After 10-15 minutes, the air temperature immediately increased by one degree, and then by another half a degree and reached 23 ° C.
Walking like that, I thought, and at 19.00 I turned on both fans at full power. The temperature in two hours increased by one more degree and reached 24 ° C.
DIY assembly
So, all the starting materials have been prepared. In addition to them, you will need some locksmith tools and equipment, which will not be difficult to find. For example, in the absence of your own, you can borrow a welding machine from a neighbor in the garage (you still don't plan to assemble and test the product in an apartment, do you?).
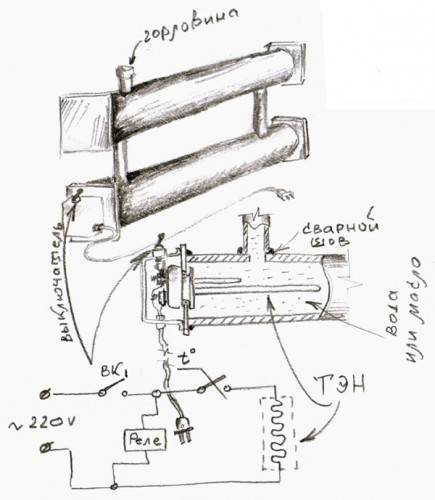
Diagram of a homemade heater
Do-it-yourself assembly will be carried out mainly in place, you just need to pay attention to such individual points:
- for better oil circulation, the heating elements are placed in the lower part and on the sides, they should not come into contact with each other and with the body;
- if the shape and volume of the body do not sufficiently ensure the natural convection of the liquid, one should resort to equipping the structure with a pump and an electric drive;
- for emergency drainage of oil and relief of pressure, it is recommended to provide appropriate holes with valves;
- the case must be grounded;
- Before use, it is recommended to thoroughly test the device for functionality.
As you can see, it is not so difficult to design an oil heater yourself. If you take great care in design and manufacture, it will respond to you with all its warmth in inclement weather. If assembling the device seems too complicated, you can always choose an oil cooler in the store.
Sizing calculation
It is not very difficult to make a pipe heating device yourself. But there is one important point - to correctly calculate the size of the device. After all, it is on them that such an indicator as heat transfer will depend.
Necessary indicators
The calculation is not easy, because it requires some criteria for the room itself. For example: the glazing area, the number of entrance doors, which windows are installed, whether the floor, walls and ceiling have been insulated.
All this is difficult to take into account, so there is a simpler option, in which only two indicators are taken into account:
- area of the room.
- ceiling height.
How can this help when assembling a homemade heating device? To do this, you will have to make a comparison with the usual brand MS-140-500. The heat transfer of one section is 160 W, the volume is 1.45 liters. What does it give us?
You can determine exactly how many sections will be needed if you use a cast iron appliance. The total volume of the coolant that will be placed in one battery is determined from the number of sections. And knowing this number, you can approximately set the volume of the pipe radiator.
The thing is that the thermal conductivity of steel is 54 W / m * K, and that of cast iron is 46 W / m * K. That is, a small downward error will not have any effect on the quality of heat transfer.
Calculation example
We will conventionally assume that an eight-section cast-iron heater corresponds to the above-described ratio. Its volume is 8x1.45 = 11.6 liters.
Now we can calculate the length of a pipe with a diameter of 100 mm, which we will use to assemble a homemade battery. The cross-sectional area of the pipes is standard - 708.5 mm². We divide the volume by the cross-section, we get the length (we translate liters into mm³): 116000: 708.5 = 1640 mm. Or 1.64 m.
A slight deviation in both directions will not greatly affect the heat dissipation.Therefore, you can choose either 1.6 or 1.7 m.
Tips and actions
To increase the efficiency of the battery will help:
- - Installation of a heat-insulating screen behind the radiator,
- - Installation under the fan battery,
- - Painting the radiator in a dark color,
- - Increase in the number of sections (not suitable for winter).
Before proceeding with these actions, check the room with a thermal imager - it will indicate the problem areas from where the heat leaves the apartment. It is useless to raise the efficiency of the radiator if the windows "siphon" or there are other places that let the cold into the house. The thermal imager will indicate cold areas of the walls and windows, first they must be removed.
Using radiators
Heat transfer selection
So that the radiators do their job, i.e. provided a comfortable microclimate, we need to purchase a sufficient number of such devices for one room.
And here you can not do without calculations, the instructions for which are given below:
The number of heating points must correspond to the volume of the room
- The power consumption depends on how much volume needs to be heated. Therefore, we need to multiply the area of the room by its height (in meters). So, for a room with an area of 25 m 2 with ceilings of 3 m, the required value will be 75 m 3.
- Further, the volume is multiplied by the standard indicator of 41 W / m 3. This value determines the heat consumption per cubic meter of living space for central Russia. In our case, the total heat volume will be 75 * 41 = 3075 W.
For cast iron models, heat transfer is calculated per section
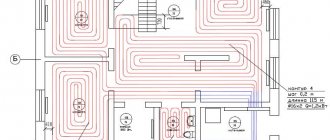
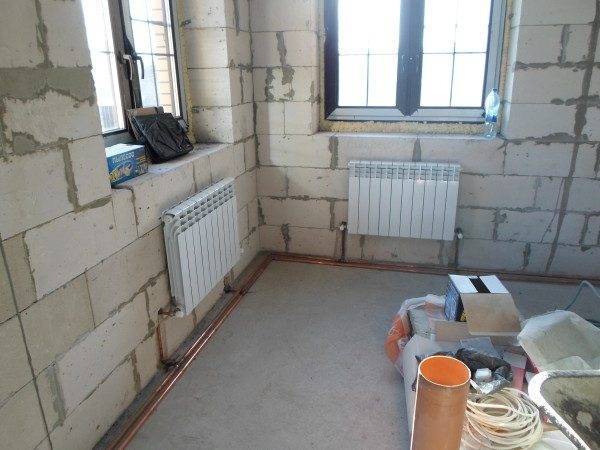
System installation
Do-it-yourself installation of radiators for heating is a rather complicated process, but this task is still feasible for most craftsmen.
Let's start the description of the algorithms with the instructions for installing electrical models:
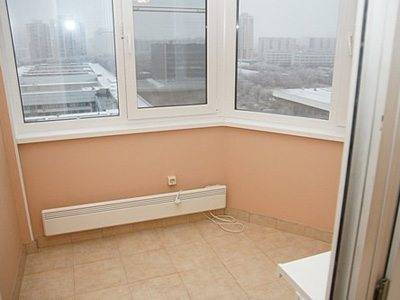
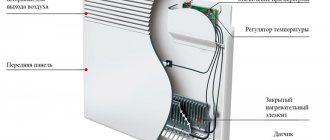
Electric radiator under the windowsill
As a rule, stationary electric heaters are mounted on the wall. In this case, for connection, either a socket located in the immediate vicinity of the device is used, or hidden wiring for a fixed connection.
- In order for heat flows to be evenly distributed in the room, the battery must be placed according to certain rules. It is extremely important to observe the size of the gaps: from the floor - about 100 mm, from the window sill - 80 - 100 mm, from the wall to the back surface of the battery - 30 - 60 mm.
- If the radiator is completely covered by a window sill, then it is advisable to make holes in it for the exit of warm air, covered with plastic grilles. Otherwise, the bottom of the window pane will continually accumulate condensation as the coldest area in the room.
- The installation of an electric radiator itself is not difficult. It is enough for us to install the mounting brackets on the wall and hang the battery on them.
Water heating systems
With water heating it is much more difficult:
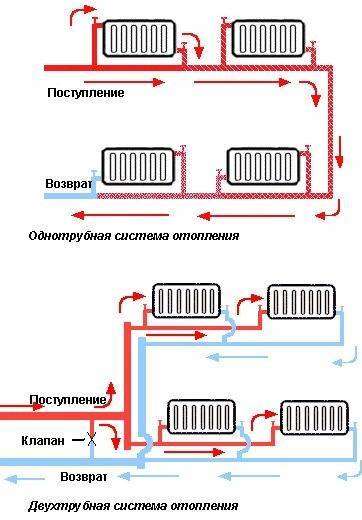
First, you need to choose a connection scheme. It depends on how efficiently the heat redistribution will take place. Possible schemes are presented in the images in our article, therefore, during installation, it is imperative to keep this information in mind.
Connection diagrams and heat loss during their implementation
- Secondly, we need to lay heating pipes. As a rule, steel or polymer products with good heat resistance are used for this purpose.
- After that, we carry out the installation of the radiator itself on wall or floor brackets. The heaviest are cast iron batteries, therefore, the most powerful fasteners are used to secure them.
- Finally, you need to attach the radiator to the pipes. Most often, threaded connections are used here, which must be as reliable and tight as possible.
Fittings for connection
After completing the installation work, it is worth testing the system
If you have not done this, then it is important to follow the announcements of the beginning of the heating season: only the first launch of a test portion of the coolant will finally demonstrate how high-quality the installation was.
Selection of the optimal position of the fan.
The coolant temperature was measured at different positions of the fan relative to the battery. At the same time, the fan power did not change.
Throughout the experiment, the temperature of the coolant was 43 ° C, the temperature in the room was 20 ° C.
In all cases, the distance from the center of the blades to the center of the battery was 70cm.
The difference in readings between the temperature of the coolant at the inlet and at the outlet is indicated in arbitrary units, since there was simply nothing to calibrate the thermometer with such high accuracy. At the same time, 0 (zero) conventional units were taken as the reference point, at which the battery was cooled naturally.
The air flow is directed from top to bottom, and the angle of inclination of the fan shaft relative to the horizon is 50º. In this case, the temperature difference at the inlet and outlet of the battery is 11 Conditional Units (hereinafter CU).
The air flow is directed from top to bottom, the fan works in the "sneak" mode (turns from side to side). Temperature difference - 8 YE.
When blowing the battery from the side, the temperature difference between the inlet and outlet is 13 YE.
By directing the air flow to the center of the battery, the highest temperature difference was obtained - 15 YE.
If you direct the air flow to the center of the battery, but at the same time turn on the "sneak" mode, then the temperature difference will decrease to - 12 YE.
Findings.
The most advantageous, from the point of view of heat transfer, turned out to be the direction of the air flow from the floor towards the plane of the battery.
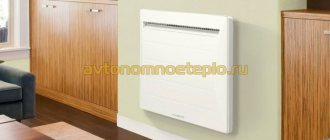
Advantages and disadvantages of oil heaters
Among electric heating devices, oil ones are the only ones called electric radiators. Oil heating has a lot of advantages:
- does not dry the air;
- radiators transfer heat mainly by means of thermal radiation;
- has a safe design;
- the surface almost never heats up above 50-60 oC;
- easy installation and management.
All this is true, but there are also disadvantages. The main thing is a sufficiently large inertia. The oil, which is used to transfer heat, has a high heat capacity. And until it heats up, the air will not start to warm up. But this same property allows you to smooth out temperature differences when enabled / disabled.
The biggest problem is high inertia and low efficiency: too many stages of heat transfer
The second disadvantage is that the safety and durability of work depends on the quality of workmanship. An incorrectly calculated design can simply burst when heated, poorly sealed seams, and oil will flow. Therefore, buying cheap, but unknown brands is a risky business.
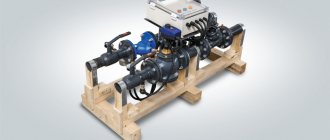
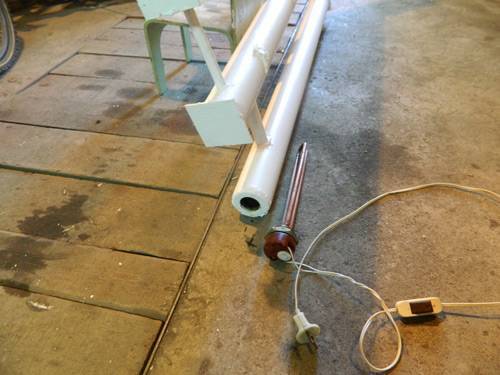
Criteria for the selection of the required materials
Since a homemade apparatus is assembled from units that have already been used once, the first step is to assess the condition of the pipes
Particular attention will need to be paid to their walls. Their thickness should be several millimeters.
If the appearance of corrosion is observed, then it is undesirable to use such pipes or it is imperative to eliminate all defects before use. All rust will need to be qualitatively removed from the metal with a brush, and then covered with an anti-corrosion compound so that the problem does not arise during operation in the future.
For manufacturing, pipes with a diameter of about 12 cm are usually used. For end caps, sheet metal of an appropriate size is used.
To make bypass channels and fittings, you will need to use pipes of a smaller diameter, which can eventually be connected to the heating system. The threads are pre-cut on the fittings, for this reason, you need the appropriate equipment - a "pin" (for creating an external thread) and a tap (for cutting an internal thread).
A DIY oil cooler can be made portable. In this case, small pipes will be used, and oil is used as a heat carrier. Heating elements are used instead of heating elements. The choice of this component depends on the area of the room to be heated. On such a device, home craftsmen often install an additional thermostat, which periodically turns on and off the heating element.
For good wall anchoring, you will also need strong hooks that can support the weight of the unit. For a more aesthetic look, they can be purchased at the store. But if there is no desire to spend additional funds, then rods of solid reinforcement will do, which will need to be fixed in the wall. It is advisable to pre-paint the hooks in the same color as the heater was painted - so the fittings will become invisible.


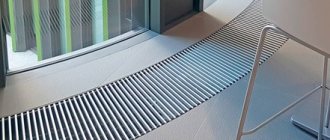
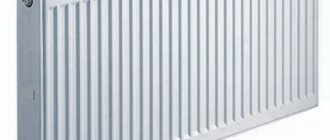
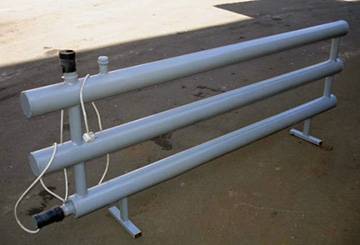
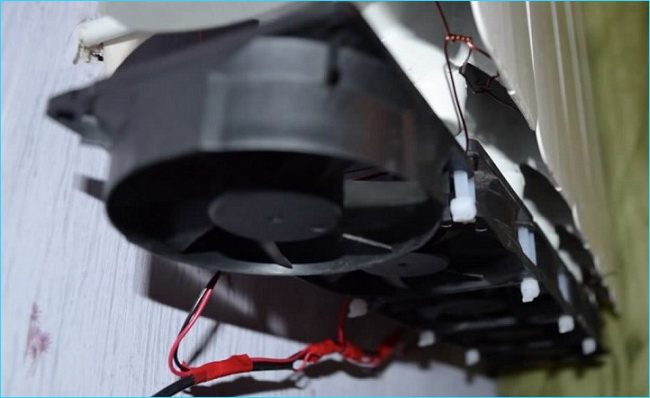
We make a convector out of an ordinary battery
Hot water radiators, or simply batteries used in centralized heating systems, distribute heat through rooms using the principle of passive convection, which is very inefficient in terms of heat loss, especially if the battery is in the corner of the room.
For this reason, there are convection radiators equipped with a fan, which improves heat distribution throughout the room, accelerating the circulation of air between the battery sections.
In this master class, I will show you how to pump a conventional battery to a convector battery with your own hands.
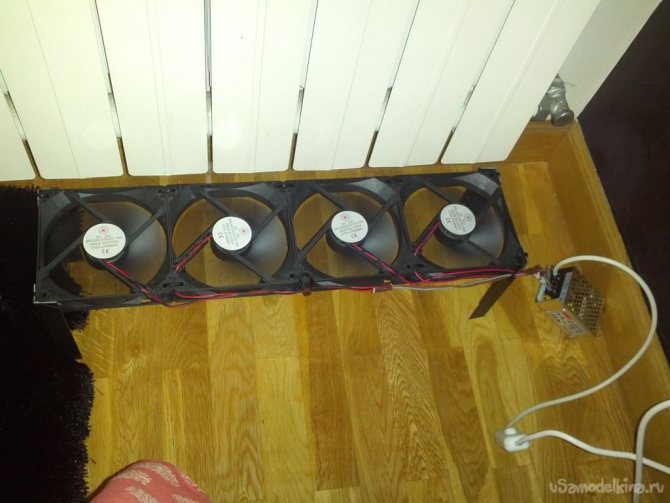
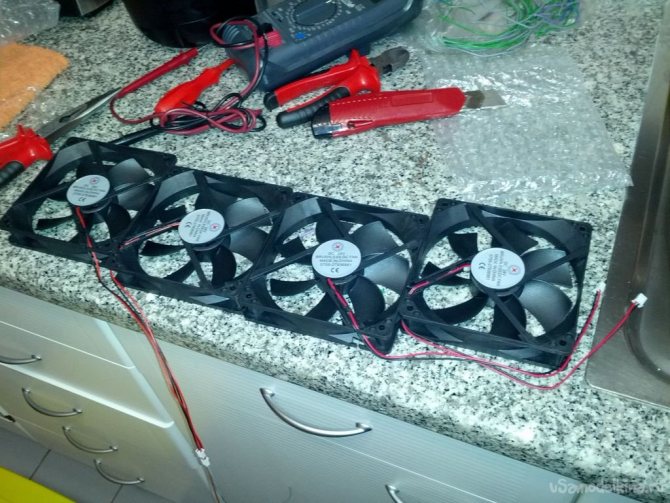
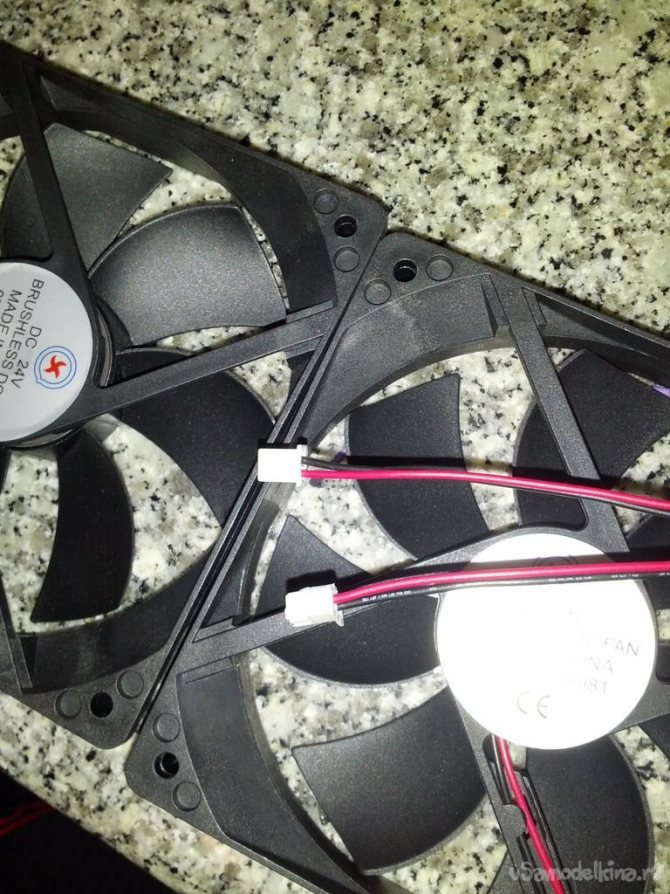
Step 1: Assembling the fans
I took 4 fans Brushless DC Cooling Fan 7 Blade 24V 120mmx120mx25mm
.
This type of fan is very quiet and fits well with my battery. A connection of 4 such fans will be enough for my pipe in length.
Fan characteristics: - 7 plastic blades - speed of 1600 rotations per minute - air flow 58 cu. ft / min. - 38 dB noise. - Power supply: DC 24V, 0.20A
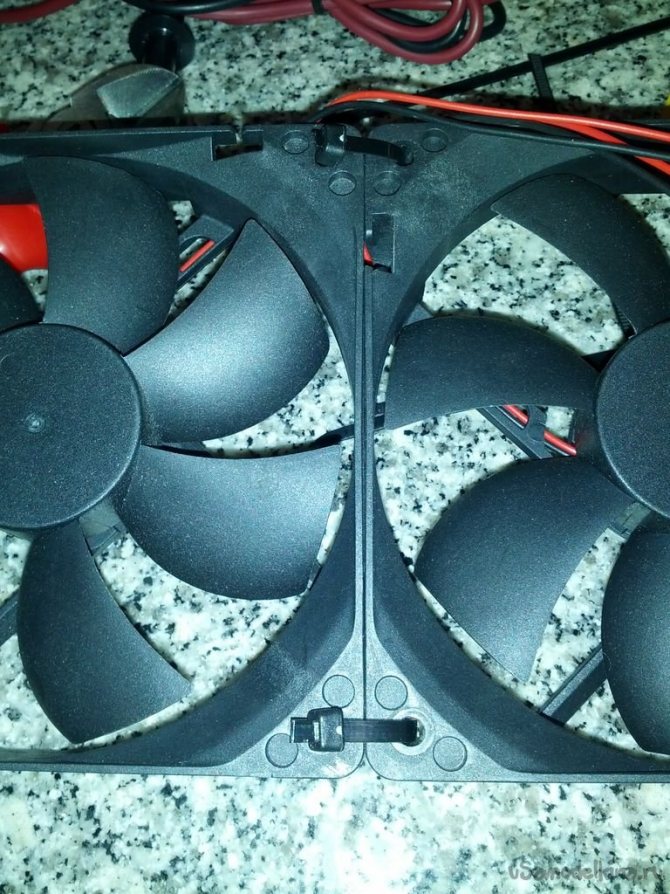
These fans cost me 1200 rubles with delivery. Structural strength is provided by cable ties that pass through the holes in the corner of each fan and tie them together.
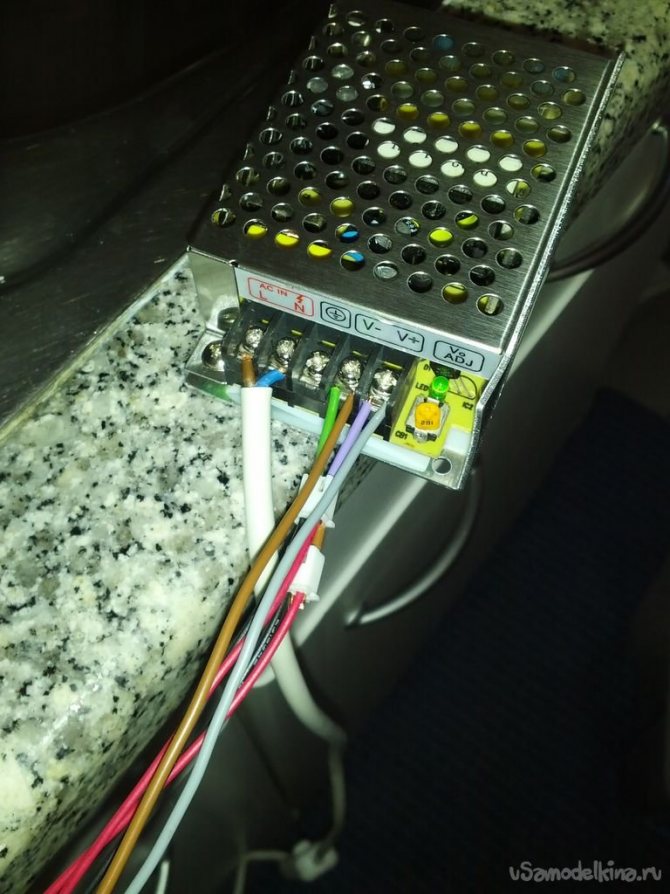
Step 2: Connect the wires
The fans use standard 2-pin connectors like motherboards. They hold copper cables well. You can also connect the 2 connectors with a small piece of cable by inserting one into the back of the other.
This will help reduce the number of cables connecting the fans to the power supply. The power supply is connected by a 2-wire AC cable on one side and DC cables from the fans on the other.
The photo does not show the switch and the standard plug at the end of the AC cable. I took the power supply unit like this - 24V Universal Regulated Switching 25W Power Supply
.
Step 3: Checking the fan operation
I connected the fans and tested them before installing them under the battery.
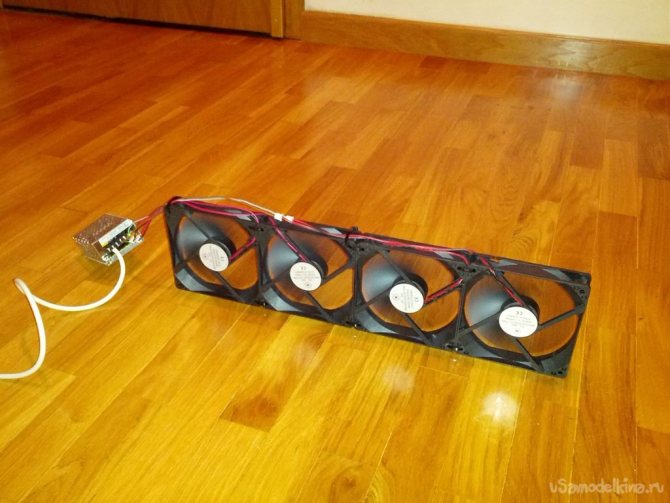
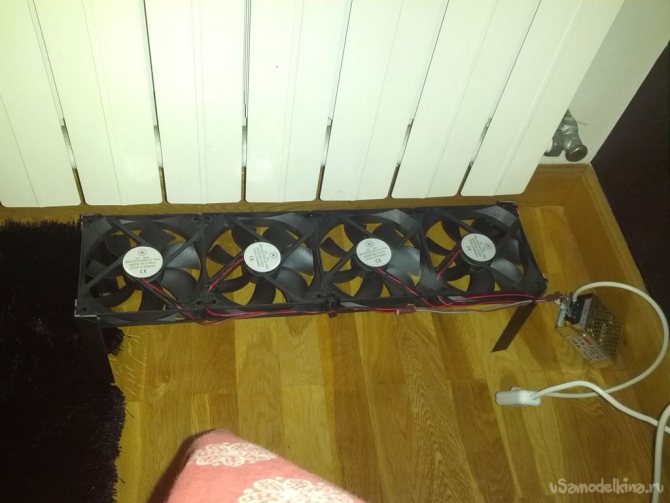
Step 4: legs and other tweaks
I fitted my fans with 4 legs from a corner cut into 15cm pieces. Then I just put a section under the battery. As a result, I got excellent heat distribution throughout the room, using almost silent fans consuming a total of 24 watts:
- fans: 4 * 0.2A * 24V = 19.2 W - power consumption: 80% of the total supply - total power: 19.2 / 80% = 24W
This is how I pumped my standard hot water heater to a convection radiator.
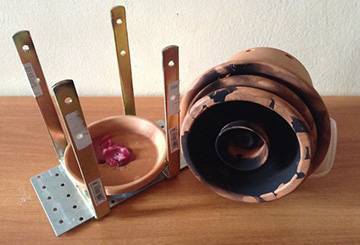
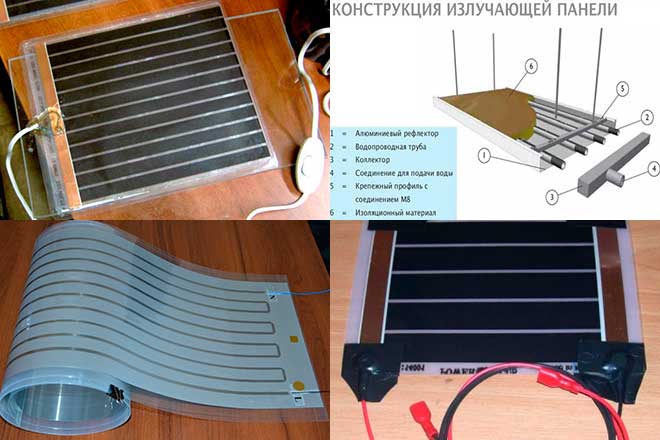
Making an infrared heater with your own hands
Modern IR emitters for home heating are reliable, practical and have good efficiency. Such devices emit infrared radiation, which, without interacting with air, contributes to the rapid heating of various surfaces in the room. Thus, they efficiently convert electricity into heat energy.
The most affordable option for home assembly is an economical film heater based on a heating film.
For work, you will need to prepare the following materials and tools:
- two identical pieces of glass,
- aluminum foil,
- sealant,
- paraffin candle,
- epoxy resin glue,
- electric wire with a plug,
- candle holder,
- sticks for cleaning soot,
- sponge for cleaning the glass surface.
Do-it-yourself infrared heater is assembled according to the following scheme:
- Glass is thoroughly cleaned from dirt and degreased.
- A conductive base for the heater is assembled. A candle is applied to the back of the glass blanks with soot, which acts as a kind of current conductor. Before starting the procedure, the workpieces are slightly cooled.
- Along the perimeter of the blanks, the surface is cleaned from soot with sticks to obtain an even edging 0.5 cm wide.
- Strips of a width equal to the area of the conductive glass base are cut from the foil. They will be used as conductive electrodes.
- One workpiece is laid on a flat surface with the smoked side up, and glue is applied with a thin layer around the perimeter. Foil strips are applied to the glued surface with a slight shift beyond the edges of the workpiece.
- From above it is covered with a second blank, respectively, with the smoked side down, it is pressed to set the glue. All joints are carefully treated with a sealant.
- Checking the power of the finished structure. If the power indicator does not exceed 100 W per 1 sq. m of the room, then the heater is connected to the network using a conductive wire and a plug.

The resistance of the conductive base of the heater is measured with a multimeter. To calculate the power, a simple formula is used: N = U × U / R, where
N - power, U - mains voltage (220 volts), R - resistance.
For example, R is 20 Ohm, then N = 220 × 220/20. The result is 2420 watts. This power is enough to heat a room with an area of 25 sq. m.
Homemade heaters pros and cons
As a rule, homemade heat generators are copies of industrially manufactured devices. These copies, with rare exceptions, are inferior to the originals in many respects, but due to certain circumstances, the consumer often chooses a home-made unit.
"Pros" of using handicraft devices:
- relatively low cost (when making with your own hands and using improvised means);
- the possibility of assembling a unit of the required dimensions and manufacturing a body with the desired strength characteristics, up to vandal-proof performance.
The main argument "against" is the undefined degree of safety of home-made heating devices during operation, fraught with unpredictable negative consequences not only for the owner of the unit, but also for those around them.
This argument is due to many factors, and its validity is annually confirmed by numerous fires caused by handicraft heaters used in violation of the Decree of the Government of R.F. "On fire regime" No. 390 of April 25, 2012 (as amended on November 18, 2017)

Excerpt from the Decree on the fire regime in R.F. on the prohibition of the use of homemade heaters
As for the secondary arguments against, they are as follows:
- lack of legitimate guarantees from the manufacturer;
- uncertainty of some characteristics of homemade devices;
- low aesthetics and the degree of automation of handicraft units.
If acquaintance with these arguments still did not push you to buy a factory-made heater in the store, we will consider how to make the heater yourself so that the likelihood of an accident when using it is as small as possible.
Selection of materials
As is clear from the above, in order to obtain a homemade heater, you will need to get the following components somewhere:
- body;
- butter;
- Heating element;
- mobile stand;
- control and automation devices.
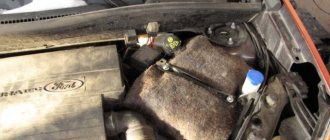
As a body, you can borrow an old radiator from a central heating system, sheet or sectional. An automobile, or any similar product, the design of which will allow the liquid to circulate inside in a natural or artificial (using an electric motor) way, is also quite suitable. You can also make a closed loop of steel pipes with your own hands.
The main thing is not to forget that an indispensable condition for the normal functioning of the system will be to ensure the tightness of the case. If the liquid begins to leak, then such a homemade device is unlikely to bring more benefit than it will cause trouble.
As for the oil, then, firstly, its amount should be based on the calculation
85% of the volume of the case. The rest of the cavity is filled with air. This 15% area is retained so that the oil does not crush the housing due to thermal expansion during operation.
Secondly, the quality characteristics of the liquid must meet at least two criteria: purity and heat resistance. Dirt and impurities will shorten the life of the heating element, causing scale to build up on it. And the decent temperature of the heating element suggests that you should select technical oil of the appropriate brand. A suitable option would be, for example, a transformer.
The number and characteristics of heating elements are selected depending on the required power of the heater (and taking into account the overall dimensions of the case). Conventionally, we can assume that to create a comfortable atmosphere in a room with a normal ceiling height, it is required
1 kW per 10 sq. m. For rooms with high ceilings, poorly insulated, located in cold areas, etc., several times more powerful products are needed.
Of course, the possibilities of the power supply network in the place where it is planned to use a self-made device should also be taken into account.
In terms of durability, it is also important to consider the possible combinations of the heating element and housing metals. For example, it is not recommended to use heaters with a magnesium anode.
combine aluminum and regular steel (not stainless) with copper.
Installation of heating elements in the heater case
Since the structure, in all likelihood, will have an impressive mass, then a mobile platform on wheels, if one is planned to be included in a homemade device, must withstand the load assigned to it. It can be made, for example, from rolled steel - angles, channels, etc. materials.
Switches or rheostat are selected in accordance with the total power load of the device.
A bimetal plate (taken, for example, from an old iron) should be used as a thermostat. When choosing a setting for it with optimal temperature characteristics, one must proceed not only from considerations of saving energy, but also from the fact that excessive heating can provoke an increase in pressure inside the case to a too high level.
For a better guarantee of safety, an additional thermal fuse can be provided. Or a similar switch that operates at a certain pressure.
Results and conclusions.
- I managed to increase the air temperature in the room by as much as 6 ° C, and in the extreme operating mode of the fans even by 9 ° C, which confirmed the assumption that it is possible to increase the heat transfer of the central heating battery even at such a low temperature of the coolant.
- When using a regular household fan without a speed controller, the room becomes too noisy. However, if you use the heat accumulated in the room, then, for example, in the bedroom you can turn off the fan at night, and in the dining room, on the contrary, turn it on.Then the fan can be used at full power.
- If you are in that part of the room where the movement of the air generated by the fan is most noticeable, then a false sensation of a decrease in temperature is created.
- Those who fear that the fan will wind up a lot can calculate the monthly energy consumption.
35(Watt) * 24(hours) * 30(days) ≈ 25(kW * hour)